")
Okay, so I got this idea the other day, just popped into my head, about all those lines on a rugby field. You know, you watch a game, and they’re just there. But I started wondering, what if I tried to actually, like, draw them all out properly? Seemed like a neat little challenge for myself.
Getting Started – The Blank Page
First off, I didn’t just jump into using fancy software or anything. Nah, I grabbed a piece of paper and a pencil. Old school. I figured I needed to get a feel for the basic shapes first. The main rectangle, that was easy enough. But then you start thinking about the try lines, the dead ball lines, and where exactly they go. I sketched it out roughly, just to get a visual in my head. It looked a bit wonky, to be honest, but it was a start.
Figuring Out the Dimensions
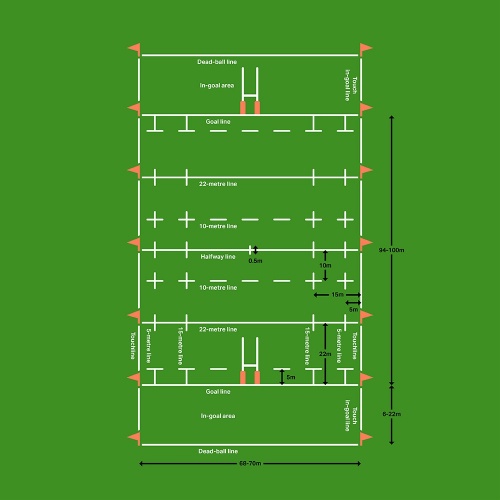
Then I thought, right, if I’m gonna do this, I should at least try to get the proportions somewhat accurate. So I did a quick search online, you know, “rugby field dimensions.” Found some standard measurements. Length, width, how far the 22-metre line is from the try line, that sort of thing. Didn’t go crazy measuring every little detail down to the millimeter, but I wanted a good guide.
This is where it got a bit more involved.
I decided to use a simple drawing program on my computer. Nothing fancy, just something that lets you draw straight lines and measure things a bit. I started with the main perimeter – the touchlines and the dead ball lines. Getting that big rectangle down felt like a good first step. Then I marked out where the goal lines (or try lines, whatever you call ’em) should be. That already started to look like something.
Adding the Key Lines
Next up was the halfway line. Easy peasy, just a line straight across the middle. Then the 22-metre lines. Had to measure those out from each goal line. This is where having those initial dimensions helped, otherwise, I’d just be guessing.
Then came the slightly trickier ones for me:
- The 10-metre lines (from the halfway line, for kick-offs).
- The 5-metre lines (running parallel to the touchlines and the goal lines – those dashed ones near the touchline and the solid ones near the try line).
- The 15-metre lines (from the touchlines, marking the edge of the lineout).
Getting the spacing right for all these smaller lines, making sure they were parallel, that took a bit of fiddling. I had to zoom in, adjust things, zoom out, see how it looked. Redrew a few lines more than once, I can tell you that. Sometimes I’d draw a line and it just looked… off. So I’d delete it and try again.
The Little Details (Well, Some of Them)
I even put in the little dash marks for the 5-metre lines that are parallel to the touchlines. And those short lines that mark the 5-metre and 15-metre points from the touchline, crossing the other transverse lines. It’s surprising how many lines there actually are when you start to break it down!
I didn’t bother with the goalposts or any super fine details like the exact markings for scrum positions or anything. My main goal was just to get all the primary playing lines onto the “field.”
What I Learned and How It Went
It was actually a pretty satisfying little exercise. You look at a rugby field and you don’t always appreciate the geometry of it, you know? But actually drawing it out, line by line, gives you a different perspective.
The biggest challenge? Probably just patience. And getting things to look reasonably proportional without getting bogged down in being too precise. I wasn’t trying to create an official blueprint, just a representation.
In the end, I had something that, yeah, looked like a rugby field! All the main lines were there. It wasn’t perfect, I’m sure a groundskeeper would find plenty wrong with it, but for a little personal project, I was pretty chuffed. It was a good way to spend an afternoon, just focusing on one simple task and seeing it through.